Author:Andy
Released:December 30, 2025
You walk into your garage every day, probably stepping over that jagged line running across the floor without giving it much thought. At first glance, it might look like a simple cosmetic crack, a normal sign of an older home that would need a big construction crew to fix.
But what you might not realize is that these small gaps could be early warning signs of moisture seeping in or shifts in the foundation, issues that, if ignored, could cost you thousands in repairs down the line.
Fixing a cracked concrete floor is something you can handle yourself with the right materials and a little patience. Addressing those cracks now not only improves how your garage looks but also protects your home from moisture and wear, giving your workspace a smooth, professional finish you will actually enjoy using.
Why Your Garage Floor Is Cracking
Before you reach for a bag of mix, it is helpful to understand what your floor is trying to tell you. Concrete is incredibly strong in compression but weak in tension. As the ground beneath your home shifts or the concrete shrinks during curing, internal stresses build up until the slab snaps.
Common Culprits Of Concrete Failure
Shrinkage: As moisture leaves the concrete during its initial pour, the volume decreases. If walls or pipes restrict the slab, it will crack to relieve the tension.
Settlement: If the soil was not properly compacted before the garage was built, sections of the floor may sink, creating deep, structural offsets.
Freeze-Thaw Cycles: In colder climates, water enters small pores in the cement, freezes, expands, and eventually blasts the concrete apart from the inside.
Understanding the why helps you choose the how. For instance, a crack that is still moving (active) requires a different approach than one that has been stable for a decade.
Choosing The Right Materials For Cracked Concrete Floor Repair
Not all fillers are created equal. If you use a basic mortar on a crack that experiences heavy vehicle traffic, it will likely pop out within a year. To ensure a permanent repair for a cracked concrete garage floor, you must match the material to the specific needs of the damage.
1. Cement-Based Fillers And Patching Compounds
These are the traditional options for repairing a cracked cement floor. Usually sold as a dry powder, you mix them with water or a liquid bonding agent.
Pros: Very affordable; matches the color and texture of the original floor fairly well; easy to clean up with water.
Cons: Brittle; does not bond well to very narrow cracks; prone to shrinking as it dries.
Best For: Wide, deep holes or static cracks in areas that don't see heavy chemical spills.
2. Epoxy Mortars And Resins
Epoxy is the gold standard for structural strength. It consists of a resin and a hardener that, when mixed, create a chemical bond stronger than the concrete itself.
Pros: Incredible adhesive strength; waterproof; oil- and salt-resistant; does not shrink.
Cons: Expensive; fast pot life (you must work quickly); difficult to sand once cured.
Best For: Hairline cracks that need to be welded back together or floors that will eventually be coated with a decorative epoxy finish.
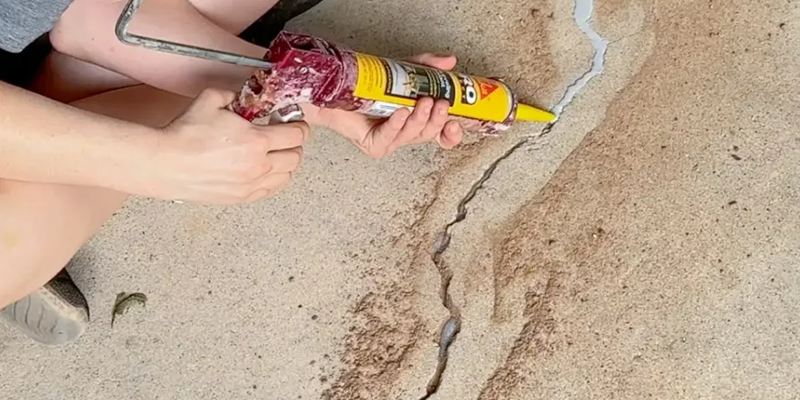
3. Polyurethane And Polyurea Sealants
These are flexible, rubber-like materials often used in expansion joints.
Pros: Stays flexible; moves with the slab during temperature changes; extremely fast cure times (some are traffic-ready in 30 minutes).
Cons: Requires a caulking gun; can be messy to level; usually more expensive than cementitious options.
Best For: Active cracks or joints that expand and contract with the seasons.
Step-By-Step Guide To Repair Cracked Concrete Garage Floor
A professional-grade repair is 90% preparation and 10% application. If you pour filler over a dusty crack, it will peel off like a scab. Follow these steps to ensure your repair of the cracked concrete garage floor project lasts for the life of the home.
Phase 1: The V-Groove Preparation
To give the repair material enough surface area to grab, you often need to make the crack slightly wider at the top.
- Safety First: Wear a high-quality respirator. Concrete dust contains crystalline silica, which is hazardous if inhaled. You can find safety guidelines for silica exposure on the [OSHA] website.
- Chisel or Grind: Use a hammer and a cold chisel (or an angle grinder with a diamond blade) to chase the crack. Aim to create a V- or U-shaped groove about 1/4 inch wide and 1/2 inch deep.
- Remove Loose Debris: Tap the edges of the crack to ensure no hollow or loose chunks remain.
Phase 2: Deep Cleaning
The interior of the crack must be surgically clean.
- Vacuum: Use a shop-vac with a HEPA filter to suck out every grain of sand and dust.
- Degrease: If your garage floor has oil stains, use a heavy-duty degreaser and a wire brush. Oil is the enemy of adhesion.
- Dry: Ensure the area is bone-dry. Most epoxies will not bond to damp concrete.
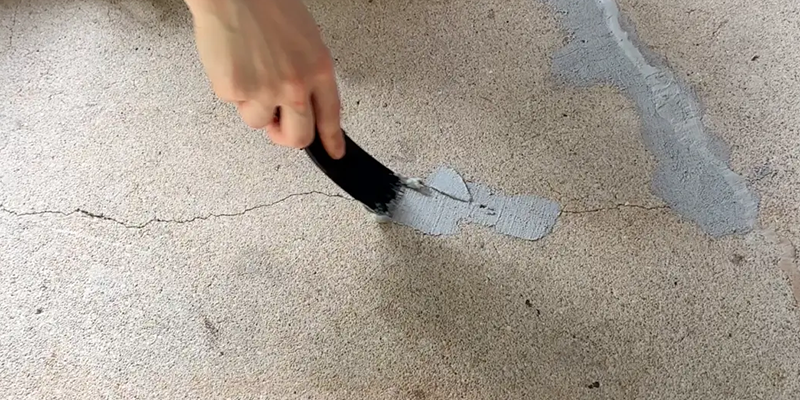
Phase 3: Applying The Filler
Now that the wound is clean, it's time to seal it.
- Prime (Optional but Recommended): Some high-end kits include a liquid primer that soaks into the concrete's pores to improve bond strength.
- Mix and Fill: Mix your chosen compound according to the manufacturer's exact ratios. Pour or trowel the material into the crack, slightly overfilling it.
- Remove Air Bubbles: Use a putty knife to stab the material, ensuring it reaches the very bottom of the groove.
- Screed Level: Drag a flat trowel across the surface to remove excess material, making it flush with the rest of the floor.
Professional Tips For A Seamless Finish
To achieve a result that is nearly invisible, or at least perfectly smooth, consider these insider techniques used by flooring contractors.
Sanding For Perfection
If you used a cement-based or epoxy patch, it will likely have a slight ridge or a different texture than the surrounding slab. Once fully cured (usually 24 hours), use a 60-grit sandpaper or a concrete rubbing stone to grind the patch down until it is perfectly level. This is essential if you plan on painting the floor later.
Color Matching
Concrete is rarely just gray. It has undertones of blue, yellow, or brown. If you are using a cementitious filler, you can add a tiny amount of liquid masonry pigment to the mix to match your existing floor. Always test a small batch first, as the color lightens significantly as it dries.
Managing The Temperature
Most repair materials have a sweet spot for application, typically between 50°F and 80°F. If your garage is freezing, the chemical reaction in epoxies will stall. If it's a scorching summer day, the material might flash set before you can level it. Use a space heater or fan to stabilize the environment before you start mixing.
Give Your Garage Floor a Fresh Start
Repairing your garage floor is a rewarding weekend project that provides immediate visual and structural benefits. By picking the right material, whether a rigid epoxy for strong, long-lasting repair or a flexible polyurea for areas that shift, and putting in some careful prep work, you can get a smooth, professional-looking finish on your cracked concrete floor.
Don't wait for a small hairline fracture to become a major foundation issue. Grab your tools, clear out the garage, and restore your floor to its former glory. A smooth, crack-free surface isn't just about aesthetics; it's about the pride and peace of mind that comes with a well-maintained home.


-
Home Improvements
Jewel Tone Interior Design: Rich Color Ideas For A Bold Home
January 19, 2026
-
Home Improvements
Floating Shelves For Airy And Meditative Display Areas
November 21, 2025
-
Home Improvements
Modular Cabinetry For Efficient And Calming Storage Layouts
November 16, 2025
-
Home Improvements
Planning a Spa-Inspired Bathroom Remodel For Daily Relaxation
November 14, 2025
-
Home Improvements
Upgrade Your Bathroom Faucet For Water Efficiency And Comfort
November 14, 2025
-
Home Improvements
Bringing Nature Inside: Best Bathroom Plants For a Peaceful Space
November 10, 2025